How to Mark Chain Measurement Reference Points Before Removal
Mark feeder breaker chain measurement reference points before removal so pitch, unit length, flight spacing, side, direction, and repair locations remain.
IngeniørguideOppdatert 16. september 2026
Removing a feeder breaker chain can destroy the very context needed to identify it. A chain laid out on the floor no longer shows which side faced the sprocket, where a damaged flight sat in the machine, which strand was repeatedly adjusted, or which pins defined the field measurement. If that context is not marked before disassembly, engineering may receive an excellent sample with poor traceability.
The solution is a simple pre-removal marking plan coordinated with the approved maintenance procedure. Establish a master reference, direction of travel, strand/side, repeating-unit identifiers, measurement endpoints, and repair or damage locations. Photograph each mark in place before the chain moves. The marks do not replace drawings or measurements; they preserve the map that makes those records meaningful.
Use only marking methods allowed by the site and component procedure. Do not grind, stamp, drill, weld, or otherwise alter a stressed chain component merely to create an identifier. Paint marker, tag, removable label, or a sketch may be suitable depending on the environment, but the controlled maintenance plan decides what is permissible.
Master datum
Create one unmistakable starting reference tied to a fixed machine location and photograph it in place.
Direction and side
Mark travel direction and left/right or strand identity so the removed chain cannot be reversed in the evidence record.
Measurement anchors
Label the exact joints or flights used for pitch, unit length, width, and spacing records before disassembly changes their posture.
1. Decide the Information That Must Survive Removal
List what the downstream reviewer will need: machine ID, chain side/strand, direction of travel, inlet/discharge orientation, reference flight, pitch-measurement endpoints, unit-length endpoints, flight-spacing endpoints, damaged units, repaired units, and any location associated with abnormal contact or adjustment. This list becomes the marking plan.
Do not mark every link without purpose. Too many marks can be as confusing as none. Use a hierarchy: one master datum, numbered repeating units or selected inspection stations, and targeted marks for dimensions or defects.
2. Establish a Master Reference on the Machine and Chain
Choose a fixed machine feature that will remain after the chain is removed, such as a maintenance datum, accessible frame point, or documented station. Mark the nearest chain flight or unit as the master chain reference and photograph both in one frame. The image should prove their relationship.
Record the master reference in the inspection sheet using words that another person can understand. “Flight 0 at discharge-side frame mark A” is more useful than “start here.” If the machine already has an approved numbering scheme, use it rather than inventing a parallel one.
Direction matters because wear and attachment orientation can be asymmetric. Place an approved arrow or tag on selected units and write the travel direction in the photo index. For paired chains, mark left/right or the site’s preferred strand identification on both the chain and the evidence sheet.
If there is any chance the removed chains could be mixed, use distinct tag prefixes such as L and R. Do not rely on floor position in the workshop; handling, cleaning, and inspection can reorder the assemblies quickly.
4. Label Repeating Units and Flight Positions
Number flights or repeating units from the master datum at an interval that supports the planned inspection. If the chain has one flight per repeat, the flight number can double as the repeating-unit identity. If the pattern is more complex, use a separate unit number and component suffix.
This sequence allows measurements and defects to be mapped. “Crack at flight F17, left strand” can later be related to “pitch span P16-P20” and to the machine location shown before removal. Without the unit map, those observations become isolated workshop findings.
5. Mark Pitch and Unit-Length Measurement Endpoints Explicitly
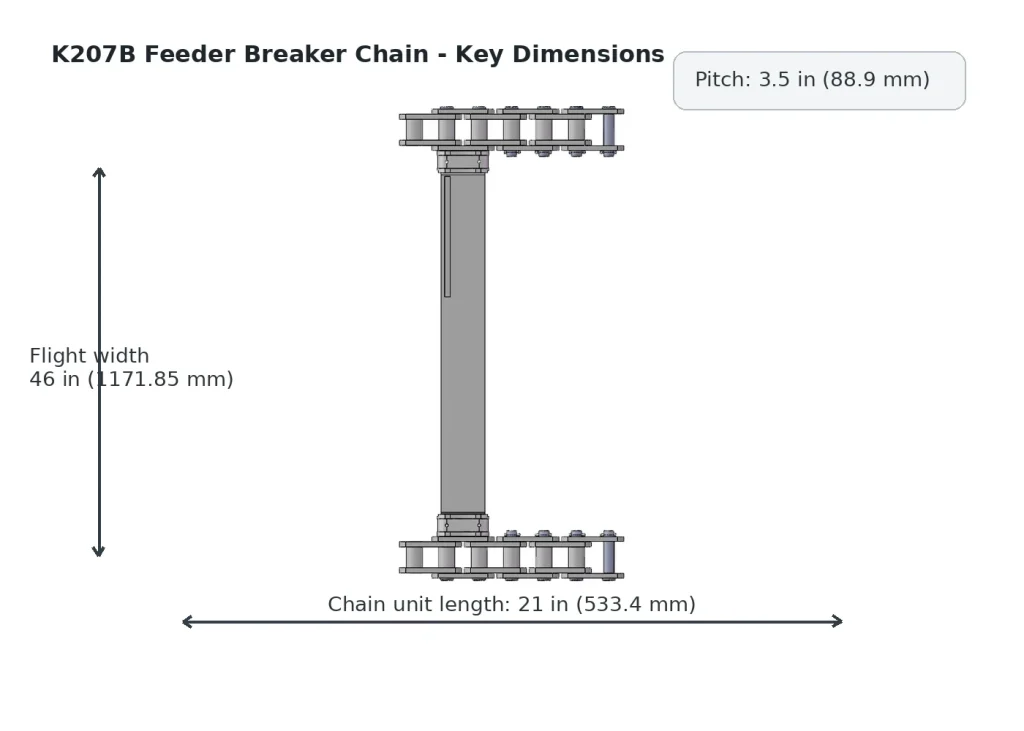
Before removal, identify the exact physical features used for each controlled measurement. Use small tags or annotated photographs to name endpoints such as P-A and P-B for a multi-pitch span and U-A/U-B for a repeating unit. Record the number of pitch intervals or units between them.
Once the chain is removed and relaxed, the measured geometry may sit differently. The pre-removal endpoint record allows engineering to distinguish a change in chain posture from a change in measurement method.
6. Map Damage and Repairs Without Hiding the As-Found Condition
Tag damaged flights, unusual joints, field welds, replaced sections, and obvious retention changes. Photograph them before cleaning or disassembly when safe. If a part will be cut or separated for laboratory inspection, give the removed sample an identifier linked to the original chain location.
Do not mark directly over a crack, wear surface, stamped identifier, or other evidence. Place the tag nearby and use the photo index to connect it to the feature. Preserving the surface may be important for later engineering or failure review.
Pre-removal marking plan
Mark
What it identifies
Record with
M0
Master chain datum tied to fixed machine reference
Wide context photo and sketch
L/R
Strand or side identity
Machine orientation and travel direction
F01…
Flight or repeating-unit sequence
Photo index and defect map
P-A / P-B
Pitch-span endpoints
Raw span, pitch count, endpoint photos
U-A / U-B
Unit-length endpoints
Repeat description and dimension
Dxx
Damage or unusual condition
As-found photo and observation
Rxx
Known field repair or replacement section
Maintenance history and comparison photo
Sxx
Removed sample identity
Parent chain section and original location
Registreringsregel
Use only approved non-damaging marking methods and preserve the photographic map before components are moved, cleaned, or separated.
7. Photograph the Marking Scheme as a Map
Take a sequence of overlapping photographs along the accessible chain path so the master datum, unit numbers, and special tags can be reconstructed. Add one simple sketch showing travel direction, left/right strands, and the approximate positions of key tags. The sketch does not need to be a production drawing; it needs to preserve relationships.
Store the images and sketch with the measurement sheet before removal begins. A marking system that exists only physically on components can still be lost when parts are cleaned, painted, or discarded.
8. Transfer the Identity to Removed Sections and Samples
As the chain is broken into handling lengths, carry the original identity onto each section. Record the first and last unit IDs in that removed piece and keep left/right and travel direction visible. If a single component is removed from a section, give it a child ID that points back to the chain section.
This chain-of-custody style record is useful even when no formal failure analysis is planned. It prevents a good component from another location becoming the accidental comparison sample for a damaged area and keeps workshop measurements tied to the original machine.
Master datum
The primary chain reference tied to a fixed machine location.
Unit map
The sequence that connects repeating chain units or flights with their original machine positions.
Measurement anchor
A labelled physical feature used as the start or end of a controlled field measurement.
Sample identity
A code that preserves the removed component’s relationship to its original chain section and machine location.
9. Reconcile Workshop Measurements with the Pre-Removal Record
After cleaning or disassembly, repeat critical dimensions where appropriate and compare them with the in-machine measurement. A difference does not automatically mean one value is wrong. Chain posture, debris removal, access, and tool position can change the reading. Keep both and explain the measurement state.
If the removed chain is being used for replacement sourcing, the final RFQ should identify which dimensions came from installed-chain measurements and which came from cleaned bench inspection. This distinction prevents later revisions from blending two measurement conditions into one unexplained number.
Bruk denne overleveringssjekklisten for å lukke feltposten for How to Mark Chain Measurement Reference Points Before RemovalMålet er ikke å lage enda et generisk vedlikeholdsskjema. Det er å bevare de spesifikke observasjonene, referansepunktene og maskinkonteksten som den neste anmelderen trenger for å forstå hvordan resultatet ble oppnådd. Hold maskinspesifikke akseptgrenser under den godkjente tegningen, vedlikeholdsprosedyren eller ingeniørinstruksjonen i stedet for å finne opp en universell nettverdi.
Kontrollpunkt
Hva som skal tas opp
Hvordan posten brukes
Decide the Information That Must Survive Removal
Record the exact machine location, strand or side, current operating/shutdown state, and the observation that relates to decide the information that must survive removal. Include a photograph that lets another reviewer find the same area.
Etablerer konteksten slik at senere målinger ikke er løsrevet fra maskinens og kjedets posisjon.
Establish a Master Reference on the Machine and Chain
Capture the physical reference used for establish a master reference on the machine and chain. Keep the raw dimension, image or marking beside the interpretation, and note any wear, repair, build-up or access limitation that could affect the reading.
Gjør resultatet repeterbart og forhindrer at en skadet eller dårlig definert referanse blir et erstatningskrav.
Mark Direction of Travel and Chain Side
Cross-check mark direction of travel and chain side against any controlled drawing, previous purchase reference or retained spare that is available. Keep current field data and historical information in separate fields when they differ.
Bevarer sporbarhet når feltforhold, historiske registreringer og nominell produktinformasjon ikke stemmer helt overens.
Label Repeating Units and Flight Positions
For label repeating units and flight positions, state what is confirmed, what is only observed, and what still needs engineering confirmation. Attach the image or measurement that supports the statement rather than relying on a product name alone.
Gir vedlikehold, innkjøp og leverandøren en tydelig liste over hva som kan gjøres med nå og hva som må løses før utgivelse.
Skill «som funnet»-tilstanden fra den nødvendige erstatningsgeometrien. A worn, repaired, dirty or partially dismantled component may still be very useful for identification, but its current shape is not automatically the manufacturing requirement. Label field measurements as observed data, retain the original unit and measurement method, and identify any feature that may have been altered by service. For chain measurement reference points, photographs should show the measurement endpoints or component relationship clearly enough that a remote reviewer can reproduce the logic.
Løs opp motstridende informasjon i stedet for å skjule den. If a drawing, old order, marking and current measurement point in different directions, keep each source visible and describe the conflict. Do not average values or silently choose the most convenient one. Use additional photographs, measurements from another intact repeating unit, machine interface information and the controlled document revision to determine which value governs. If reconcile workshop measurements with the pre-removal record cannot be confirmed during the shutdown, state that limitation explicitly so the open question survives the handoff.
Make the next action obvious for How to Mark Chain Measurement Reference Points Before Removal. Den utfylte oversikten skal fortelle vedlikeholdsavdelingen hva som bør kontrolleres på nytt, fortelle innkjøpsavdelingen hvilken informasjon som hører hjemme i tilbudsforespørselen, og fortelle ingeniøravdelingen hvilke dimensjoner eller grensesnitt som fortsatt trenger godkjenning. Før maskinen tas i bruk igjen, må du bekrefte at filsettet inneholder en helhetlig maskinvisning, en komplett gjentakende kjede-/flygingsvisning, nærbilder av relevante komponenter eller merkinger, og dimensjonene som brukes i denne veiledningen. chain measurement reference points, er et sporbart sett med observasjoner mer nyttig enn en lang fortelling uten data, og det reduserer risikoen for at en erstatningsbeslutning tas utelukkende basert på tonehøyde, utseende eller et gammelt delenummer.
Feltbeslutningsnotater for denne oppgaven
Inspeksjonsprotokollen for How to Mark Chain Measurement Reference Points Before Removal bør være enkel å bruke etter at nedstengningen er over. De følgende tre merknadene gjør artikkelen om til en praktisk overlevering uten å opprette en maskinspesifikk akseptgrense. De er spesielt nyttige når vedlikeholdsobservasjoner må gjennomgås senere av ingeniører eller innkjøpere, og den opprinnelige kjeden ikke lenger er tilgjengelig.
Confirm Decide the Information That Must Survive Removal
Start med å identifisere hvor og hvordan observasjonen ble gjort. Registrer maskinen, kjedesiden eller -tråden, den gjentakende enheten eller flyplasseringen, og kjedets tilstand da kontrollen ble utført. Hvis komponenten var skitten, belastet, slapp, fjernet, reparert eller synlig deformert, må du oppgi denne tilstanden ved siden av avlesningen. Et fotografi bør inkludere nok omkringliggende struktur til at en annen person kan finne samme sted. Målet for denne artikkelen er å bevare konteksten bak decide the information that must survive removal heller enn å redusere det til et isolert tall.
Cross-check Establish a Master Reference on the Machine and Chain
Bruk en andre observasjon eller kontrollert referanse for å utfordre det første resultatet. Det kan være en nærliggende intakt repeterende enhet, en annen kjettingstreng, en tegningsrevisjon, en tidligere kjøpsregistrering eller en beholdt reservedel. Hold den opprinnelige feltverdien synlig selv når sammenligningen antyder et annet nominelt krav. Når de to ikke stemmer overens, beskriv hvorfor forskjellen kan eksistere og identifiser hva som må bekreftes videre. Dette er spesielt viktig for establish a master reference on the machine and chain, fordi slitasje, målemetode og tidligere reparasjoner kan påvirke den opprinnelige tilstanden.
Prepare Mark Direction of Travel and Chain Side for review
Pakk resultatet slik at det kan kontrolleres eksternt. Inkluder den rå målingen eller observasjonen, dens enhet, referanseflater eller endepunkter, minst ett nært fotografi og ett kontekstfotografi, og eventuelle tegninger eller merkinger som ble brukt under identifikasjonen. Oppgi om elementet er bekreftet, kandidat eller ukjent. Hvis mark direction of travel and chain side avhenger av en antagelse, skriv det åpne spørsmålet i tilbudsforespørselen i stedet for å konvertere antagelsen til en spesifikasjon. Mottakeren skal kunne forstå kjedebetingelsen uten å rekonstruere metoden fra minnet.
Hold beslutningsgrensen synlig. Label Repeating Units and Flight Positions may influence the next maintenance or sourcing step, but the website does not set a universal discard, tension or interchangeability limit. Use the equipment procedure, approved drawing and order-specific engineering requirements for acceptance decisions. The purpose of this record is to make the observation behind chain measurement reference points sporbar nok til at riktig produkt eller konstruksjonsrute kan velges uten å gjette.
Spørsmål som må avklares før neste avgjørelse
Should I stamp identification numbers into the chain?
Do not alter a stressed component unless the approved engineering procedure explicitly permits it. Use non-damaging tags, paint marks, photographs, or sketches appropriate to the site.
Why mark direction of travel if the chain looks symmetric?
Wear, attachment orientation, and machine context may not be symmetric. Direction helps interpret component condition and reconstruct the original installation.
Can workshop measurements replace installed-chain measurements?
They can supplement them, but keep the measurement state clear. Cleaning, relaxation, disassembly, and better access can change how a dimension is obtained.
What if tags may be lost during cleaning?
Photograph every tag in place and keep a written or sketched map. Transfer identity to durable approved labels on containers or sample records before cleaning.
Next Step: Close the Measurement Record
Pre-removal marking turns a chain from a pile of parts into a traceable engineering sample. Master datum, direction, strand, unit identity, measurement anchors, damage tags, and sample IDs preserve the link between workshop evidence and the machine.
Do the mapping before disassembly starts. Once context is lost, even accurate bench dimensions may be difficult to interpret, and a replacement decision can become dependent on assumptions that could have been avoided with a few planned marks and photographs.