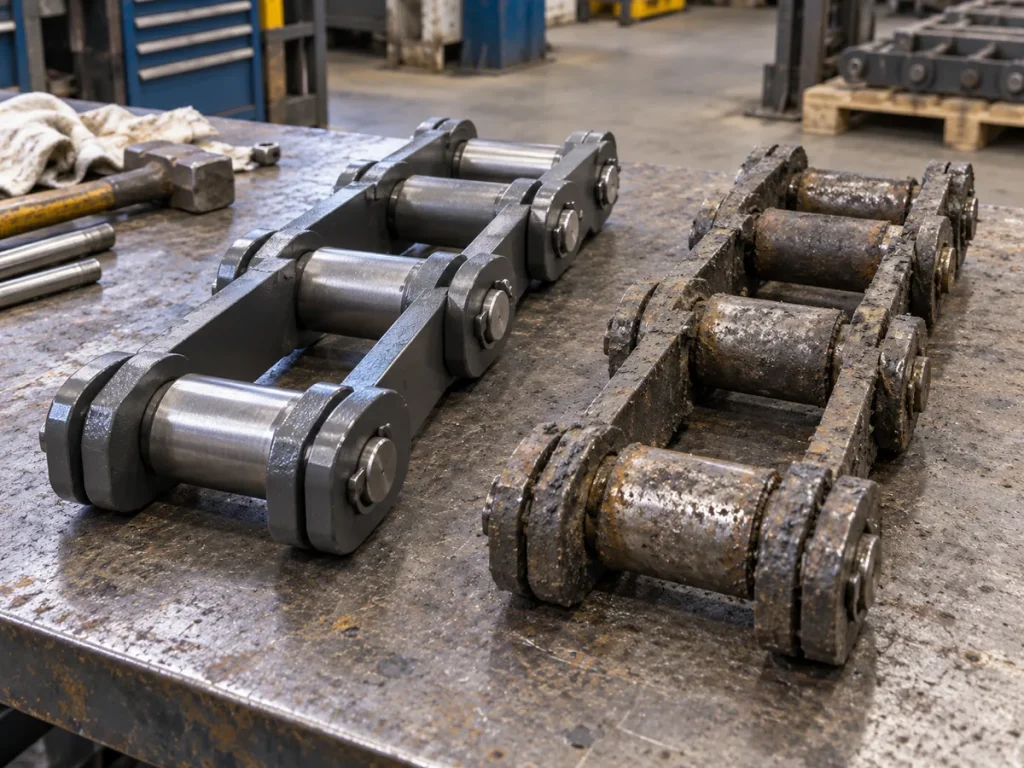
How to Prepare a Damaged Chain Sample for Identification
Prepare a damaged feeder breaker chain sample for identification with traceable location, orientation, as-found photos, safe cleaning, dimensions.
คู่มือวิศวกรรมอัปเดตไปเมื่อ 16 กันยายน 2026
A damaged feeder breaker chain sample can reveal geometry that photographs cannot: pin projection, plate thickness, bush condition, attachment detail, hole shape, hidden markings, and the relationship between failed surfaces. But a sample loses much of its value if it arrives in a box with no record of where it came from, which way it faced, or what work was performed before removal.
Preparation should therefore start while the part is still on the machine. Mark the chain location, direction of travel, strand/side, parent repeating unit, and sample boundaries. Photograph the damage in context. Record the dimensions that can be taken in place. Then remove the sample under the approved maintenance procedure and carry its identity into cleaning, measurement, packaging, and shipment.
This article is about traceability and engineering identification, not failure-analysis laboratory procedure. If the sample may be needed for metallurgical, fracture, or formal quality investigation, follow the organization’s evidence-preservation instructions and avoid cleaning or marking the failure surfaces without approval.
Preserve context
Assign machine, strand, direction, repeating-unit and damage-location IDs before the sample is removed.
Preserve condition
Take as-found photographs and avoid altering fracture, wear, marking, or contact surfaces that may matter to later review.
Preserve custody
Carry the sample ID through cleaning decision, measurements, packaging, shipment, and the engineering report.
1. Decide What Question the Sample Is Supposed to Answer
A sample taken for model identification needs enough intact geometry to measure and compare components. A sample taken to investigate a broken pin needs the pin, mating bush, surrounding plates, and fracture context. A sample taken to reproduce an unknown attachment needs the complete attachment relationship, not just the visibly damaged plate.
Write the question before cutting or separating anything. This prevents the maintenance crew from discarding the undamaged neighboring part that engineering later needs as a reference.
Give the sample a code tied to the machine, side/strand, flight or repeating-unit number, and date. Photograph a tag beside the sample while it is still installed and take a wider image showing the machine location. Record direction of travel and material-facing orientation.
If several samples are removed, use unique IDs and a simple map. Never rely on the order in which parts are placed on a pallet or bench to preserve identity.
Parent location
The exact position in the installed chain from which the sample was removed.
As-found condition
The sample state before cleaning, separation, repair, or handling changes its surfaces.
Orientation mark
A non-destructive approved identifier for travel direction, material side, or strand relationship.
Bench record
Measurements and photos taken after removal, clearly separated from installed-chain observations.
3. Capture As-Found Damage Before Cleaning
Photograph the sample dry/dirty/as found, including build-up, polishing, corrosion, impact marks, deformation, fracture position, missing retention, and nearby component condition. Use an intact comparable component in another photograph when possible.
Do not scrape, wire-brush, grind, paint, or oil a critical surface before the responsible engineer decides whether that treatment could remove useful evidence. Identification-only samples may later be cleaned, but the as-found record should already exist.
4. Record Installed Dimensions and Reference Points
Measure pitch spans, unit relationships, flight width/spacing, and relevant interface dimensions while the sample is still connected to the known chain where practical. Some relationships are easier to understand in the assembly than on a loose part.
Mark the endpoints in photographs. After removal, repeat selected dimensions and label them as bench measurements so changes in posture or cleaning do not create unexplained differences.
5. Remove Enough Adjacent Geometry for Identification
Where the maintenance and engineering plan allows, retain neighboring links or the associated flight connection rather than sending a single isolated plate. A pin without its bush can hide the mating relationship; a scraper plate without its head can hide the attachment; one chain link can hide the repeating pattern.
The correct sample size depends on the question and safe removal method. If shipping size is constrained, photograph and dimension the larger assembly before separating it and record exactly which child components came from which parent section.
6. Decide Whether and How the Sample May Be Cleaned
For dimensional identification, loose dirt may need to be removed so edges and markings can be measured. Use a method approved for the material and investigation. Keep photos before and after cleaning and note any coating, residue, or embedded material that was removed.
If formal failure analysis is possible, seek engineering or quality direction first. Cleaning can alter fracture deposits, corrosion products, lubrication evidence, or wear debris that may matter to the investigation.
7. Create a Bench Measurement Sheet
Record the sample ID, orientation marks, component names, raw dimensions, units, tools, measurement datums, and photo IDs. For a chain joint, useful records can include plate shape and thickness where controlled, pin diameter/location, bush geometry, hole locations, attachment relationships, and the distance to neighboring features. Do not invent tolerances.
Compare with candidate drawings in a separate column. Mark each feature as matches, differs, or cannot be verified because of damage. That gives engineering a clear path to the next measurement instead of a vague “sample similar to K201B.”
Damaged sample identification record
Record
What to include
Reason
Sample ID
Machine, strand, unit/flight, date
Keeps the component tied to original context.
Orientation
Travel direction, material side, left/right
Preserves asymmetric wear and attachment meaning.
As-found photos
Wide, medium, close defect views
Shows condition before cleaning or removal.
Installed measurements
Pitch/unit/width/interface values and endpoints
Preserves assembly relationships.
Bench measurements
Raw dimensions, tools, datums, post-clean state
Supports drawing/model comparison.
Cleaning record
Method, before/after photos, restrictions
Prevents loss of condition evidence.
Drawing comparison
Candidate model/revision, match/difference fields
Keeps identification transparent.
กฎการบันทึก
If a formal failure investigation may be required, follow the responsible quality/engineering evidence-preservation procedure before cleaning or modifying the sample.
8. Protect the Sample During Packaging and Shipment
Secure heavy components so they cannot strike each other and create new dents or polished surfaces. Keep tags attached to packaging as well as to the sample where permitted. Protect sharp edges and fracture surfaces under the organization’s handling requirements.
Place the sample index, contact information, and electronic photo/drawing references in the shipment documentation. Do not put the only copy of the evidence sheet loose inside a wet or dirty package.
9. Reconcile the Sample with the Installed-Chain Record
When engineering receives the sample, compare the sample ID with the pre-removal map and photographs. Confirm that orientation and parent location are understood before the sample dimensions are used to define a replacement.
If the sample is a repaired or abnormal unit, it may be useful for diagnosing the problem but poor as the sole master for the complete replacement chain. Use intact-chain evidence and drawings alongside it.
ใช้เช็คลิสต์ส่งมอบงานนี้เพื่อปิดบันทึกข้อมูลภาคสนามสำหรับ How to Prepare a Damaged Chain Sample for Identificationเป้าหมายไม่ใช่การสร้างแบบฟอร์มการบำรุงรักษาทั่วไปอีกแบบหนึ่ง แต่เป็นการรักษาข้อสังเกตเฉพาะ จุดอ้างอิง และบริบทของเครื่องจักรที่ผู้ตรวจสอบคนต่อไปต้องการเพื่อทำความเข้าใจว่าได้ผลลัพธ์มาได้อย่างไร ควรคงค่าขีดจำกัดการยอมรับเฉพาะเครื่องจักรไว้ภายใต้แบบร่างที่ได้รับอนุมัติ ขั้นตอนการบำรุงรักษา หรือคำแนะนำทางวิศวกรรม แทนที่จะสร้างค่าสากลขึ้นมาใช้แทนกัน
ด่าน
สิ่งที่ต้องบันทึก
วิธีการใช้งานบันทึก
Decide What Question the Sample Is Supposed to Answer
Record the exact machine location, strand or side, current operating/shutdown state, and the observation that relates to decide what question the sample is supposed to answer. Include a photograph that lets another reviewer find the same area.
Capture the physical reference used for assign the sample identity in the machine. Keep the raw dimension, image or marking beside the interpretation, and note any wear, repair, build-up or access limitation that could affect the reading.
Cross-check capture as-found damage before cleaning against any controlled drawing, previous purchase reference or retained spare that is available. Keep current field data and historical information in separate fields when they differ.
For record installed dimensions and reference points, state what is confirmed, what is only observed, and what still needs engineering confirmation. Attach the image or measurement that supports the statement rather than relying on a product name alone.
แยกสภาพเดิมที่พบออกจากรูปทรงเรขาคณิตที่ต้องการเปลี่ยนใหม่ A worn, repaired, dirty or partially dismantled component may still be very useful for identification, but its current shape is not automatically the manufacturing requirement. Label field measurements as observed data, retain the original unit and measurement method, and identify any feature that may have been altered by service. For damaged feeder breaker chain sample identification, photographs should show the measurement endpoints or component relationship clearly enough that a remote reviewer can reproduce the logic.
ควรแก้ไขข้อมูลที่ขัดแย้งกันแทนที่จะปกปิดมัน If a drawing, old order, marking and current measurement point in different directions, keep each source visible and describe the conflict. Do not average values or silently choose the most convenient one. Use additional photographs, measurements from another intact repeating unit, machine interface information and the controlled document revision to determine which value governs. If reconcile the sample with the installed-chain record cannot be confirmed during the shutdown, state that limitation explicitly so the open question survives the handoff.
Make the next action obvious for How to Prepare a Damaged Chain Sample for Identification. บันทึกที่เสร็จสมบูรณ์ควรแจ้งให้ฝ่ายซ่อมบำรุงทราบว่าควรตรวจสอบอะไรซ้ำ แจ้งให้ฝ่ายจัดซื้อทราบว่าข้อมูลใดควรอยู่ในใบขอใบเสนอราคา (RFQ) และแจ้งให้ฝ่ายวิศวกรรมทราบว่าขนาดหรือส่วนต่อประสานใดที่ยังต้องได้รับการอนุมัติ ก่อนที่เครื่องจักรจะกลับมาใช้งาน ให้ยืนยันว่าชุดไฟล์ประกอบด้วยภาพรวมของเครื่องจักร ภาพรวมของโซ่/ชุดใบมีดแบบซ้ำๆ ภาพระยะใกล้ของส่วนประกอบหรือเครื่องหมายที่เกี่ยวข้อง และขนาดที่ใช้ในคู่มือนี้ สำหรับ damaged feeder breaker chain sample identificationชุดข้อมูลการสังเกตที่ตรวจสอบได้นั้นมีประโยชน์มากกว่าคำบรรยายยาวๆ ที่ไม่มีข้อมูลอ้างอิง และช่วยลดความเสี่ยงที่การตัดสินใจเปลี่ยนชิ้นส่วนจะขึ้นอยู่กับระดับเสียง รูปลักษณ์ หรือหมายเลขชิ้นส่วนเก่าเพียงอย่างเดียว
หมายเหตุประกอบการตัดสินใจภาคสนามสำหรับงานนี้
บันทึกการตรวจสอบสำหรับ How to Prepare a Damaged Chain Sample for Identification ควรใช้งานง่ายหลังจากปิดระบบเสร็จสิ้นแล้ว หมายเหตุสามข้อต่อไปนี้จะแปลงบทความให้เป็นการส่งต่อที่ใช้งานได้จริงโดยไม่ต้องสร้างขีดจำกัดการยอมรับเฉพาะเครื่องจักร โดยเฉพาะอย่างยิ่งจะมีประโยชน์เมื่อฝ่ายวิศวกรรมหรือฝ่ายจัดซื้อต้องตรวจสอบข้อสังเกตด้านการบำรุงรักษาในภายหลัง และไม่สามารถเข้าถึงห่วงโซ่การส่งต่อเดิมได้อีกต่อไป
Confirm Decide What Question the Sample Is Supposed to Answer
เริ่มต้นด้วยการระบุตำแหน่งและวิธีการตรวจสอบ บันทึกเครื่องจักร ด้านโซ่หรือเส้นใย หน่วยซ้ำ หรือตำแหน่งเกลียว และสภาพของโซ่ขณะตรวจสอบ หากชิ้นส่วนสกปรก มีภาระ หย่อนยาน ถูกถอดออก ซ่อมแซม หรือเสียรูปทรงอย่างเห็นได้ชัด ให้บันทึกสภาพนั้นไว้ข้างๆ ข้อมูลที่บันทึกไว้ ภาพถ่ายควรมีโครงสร้างโดยรอบมากพอที่จะช่วยให้บุคคลอื่นสามารถหาตำแหน่งเดียวกันได้ สำหรับบทความนี้ จุดมุ่งหมายคือการรักษาบริบทเบื้องหลังไว้ decide what question the sample is supposed to answer แทนที่จะลดทอนให้เหลือเพียงตัวเลขที่โดดเดี่ยว
Cross-check Assign the Sample Identity in the Machine
ใช้ข้อมูลสังเกตการณ์ที่สองหรือข้อมูลอ้างอิงที่ควบคุมได้เพื่อตรวจสอบผลลัพธ์แรก อาจเป็นหน่วยซ้ำที่สมบูรณ์ที่อยู่ใกล้เคียง เส้นใยโซ่อื่น การแก้ไขแบบร่าง บันทึกการซื้อก่อนหน้า หรือชิ้นส่วนอะไหล่ที่เก็บไว้ ให้แสดงค่าฟิลด์เดิมไว้แม้ว่าการเปรียบเทียบจะชี้ให้เห็นถึงข้อกำหนดที่กำหนดแตกต่างกัน เมื่อทั้งสองไม่ตรงกัน ให้ระบุว่าเหตุใดจึงมีความแตกต่างเกิดขึ้น และระบุสิ่งที่ต้องยืนยันต่อไป สิ่งนี้มีความสำคัญอย่างยิ่งสำหรับ assign the sample identity in the machineเนื่องจากการสึกหรอจากการใช้งาน วิธีการวัด และการซ่อมแซมก่อนหน้านี้ อาจส่งผลต่อสภาพที่พบได้
Prepare Capture As-Found Damage Before Cleaning for review
ควรทำให้เส้นแบ่งการตัดสินใจมองเห็นได้ชัดเจน Record Installed Dimensions and Reference Points may influence the next maintenance or sourcing step, but the website does not set a universal discard, tension or interchangeability limit. Use the equipment procedure, approved drawing and order-specific engineering requirements for acceptance decisions. The purpose of this record is to make the observation behind damaged feeder breaker chain sample identification สามารถตรวจสอบย้อนกลับได้มากพอที่จะทำให้สามารถเลือกผลิตภัณฑ์หรือเส้นทางวิศวกรรมที่ถูกต้องได้โดยไม่ต้องคาดเดา
ประเด็นที่ต้องแก้ไขก่อนการตัดสินใจครั้งต่อไป
Should I clean a broken chain part before sending it?
Only after considering the purpose of the sample. For simple dimensional identification, controlled cleaning may help. For possible failure analysis, obtain engineering/quality guidance first and preserve as-found photographs.
How much chain should I send?
Send enough geometry to answer the identification question. One isolated component may be insufficient if its relationship to adjacent links, pins, bushings, or a flight must be understood.
Can I mark the sample with a grinder or punch?
Do not alter stressed or evidential surfaces unless an approved procedure permits it. Use non-damaging tags, paint markers, packaging labels, and photographs as appropriate.
What if the sample comes from a repaired area?
Label it as repaired and collect an intact comparison from the installed chain if possible. A repair sample may not represent the original design geometry.
ขั้นตอนต่อไป: ปิดบันทึกทางเทคนิค
A damaged chain sample is most valuable when its identity, orientation, as-found condition, and parent location are preserved from the machine to the engineering bench. That context allows dimensions and component features to be interpreted correctly.
Plan the sample around the question you need answered, retain enough adjacent geometry, and keep installed and bench measurements separate. If failure analysis may be required, preserve evidence first and clean later under the responsible procedure.